Welcome to my blog, hope you enjoy reading
RSS

Wednesday, September 5, 2012

Sashimi Birthday Treats

Sashimi birthday treats for my little foodie

Used - rice crispy treat for the "rice", swedish fish, and fruit roll ups cut in to strips for the seaweed

My little guy loves sushi, and LOVED this treat for his class. They were also small enough that the teacher was happy not to get the kids amped up on sugar and they were easy to pass out.

Wednesday, August 15, 2012

The Zombie themed birthday party was a lot of fun. Our son started out asking for a "Nazi Zombie" party, like his video game, but we decided that even for us, bringing Nazi's to the party is not the best idea ever. So he settled on just Zombies. We painted faces, cooked gross foods, beat a pinata... click on the picture to see more of the party!

Tuesday, May 22, 2012

Rainbow themed Art Party!!

We had a great party last weekend, click here to check out the details!


Friday, April 13, 2012

Personalized Pillow Gift

 For this project, I used a technique learned from a blog called Polish The Stars. It's super simple. Just use some spray glue to fit a piece of fabric on to a piece of cardstock. Cut the cardstock to fit, and run through the printer. For this project, I used a picture of my daughter and her best friend. She asked him what he liked, so we could get him a gift, and his older answer was "you". After getting over how incredibly sweet (and slick) that was, we decided we would make him something personalized. This pillow fit the bill!


We used some scrap material I had at home, and used stuffing from a different pillow (because I was short on time and didn't go buy batting)

 
He loved it. And so did his Mom. Apparently he carries it around with him everywhere now. We just love that little guy!

Wednesday, April 11, 2012

Sweepstakes!

In an ultimate mix of charity and child electronics, Betty Crocker is giving away a kids laptop, and to match the winner, a laptop will be donated to a child in Africa. How cool is that!

Man, this laptop is SO COOL! I would love to have one in my home for my 2 little ones.


But hurry! The contest ends on April 11th!

Monday, April 2, 2012

April Fools!!

I did the ol' classic swap dessert for dinner trick with the family last night and it was a HUGE success! Hubs even had a friend over who thought the whole thing was great.

The first course was "fish sticks, peas and carrots, and mashed potatoes with gravy. It was an idea I read about some time ago and if I find a link, I'll stick it on here.

Fish sticks- melt twix in microwave for 5 seconds, roll in toasted coconut
Mashed potatoes and gravy- ice cream with caramel sauce
veggies- picked out all of the green and a few orange gobstoppers. In retrospect, I should've chopped up some starbursts, but everyone definitely fell for my tricks anyways! Hubs thought I got a new veggie scoop tool or something. HA!

 2nd Course- ice cream and cupcakes
Cupcake- I baked meatloaf in cupcake liners (veggie meatloaf to be specific) frosted with mashed potatoes using an icing bag
Ice cream- mashed potatoes and gravy with a regular cone stuck in it.

Friday, March 23, 2012

For whatever reason, I have had a terrible time organizing this site. Be sure to check out the Fun With Food section while you're here. If you don't see it on the side tabs, here is the link
http://extraordinaryoffspring.blogspot.com/p/food_09.html

Enjoy!

For Daddy

With Father's Day coming up, I figured I'd share a quick DIY gift I made for my husband last year. It's a Clean Guy set! I found the basket at the dollar store, made the slippers using the tutorial found here:
http://www.queenofdiy.com/sewing-fashion-design/fluffy-slippers-from-old-towel.html
threw together a 'stache box using combs I found at- you guessed it- the dollar store. And a personalized towel I made by purchasing a cheap towel at Wal-Mart, using scraps for the name, and sewing in some elastic and velcro so he can wear it around the house (and believe me- he does!)


Saturday, January 14, 2012

Custom Wheels

Bikes are so much fun. We ride all the time, but it can get expensive to upgrade with the constant growth spurts of kids. We do insist on quality bikes, because they get used so much, but as you might know, we also love to upcycle everything.

Our most recent upcycled bike turned out to be a smashing success. Our son's old bmx bike was much too small for him, but also much to "boyish" for our little princess, even though her favorite color is green, and no longer, which was 'soooo pre-k'. But nonetheless, it needed some serious revamping.

So what we did was switch out the grips, the brake cable, and a few little accessories including some color changing pedals. What we did next really sealed the deal. We bought a white canvas seat and tied to it some fabric markers so that our little artist could make her bike truly 'custom'. And here is her finished product.


So for less than 50 bucks, we were able to give our daughter a "brand new bike". She didn't mind the couple little scuffs around the edges. If you don't have an old bike to revamp, be sure to check your local Craigslist. Remember that the BMX bikes are great for beginners. Their little legs can reach much easier than on your typical beach cruiser, although both types of bikes are loads of fun and a guaranteed hit with any kid! You might even be able to talk your local bike shop in to a cheap cleaning. Hey, it never hurts to ask!

Wednesday, January 4, 2012

Valentine's Day Hair

Here is a quick idea for a fun Valentine's Day hairstyle. It's pretty easy, but it's impossible to explain. Make a part in to a heart and start braiding! I used ribbon to tie it altogether.
 My newest project for my miniature artist. The entire room was done for less than 100 dollars and it was a lot of fun. Keeping things easily organized is the best way to go with little ones. If you have 2 billion drawers, it's a sure fire guarantee that all of those tiny labels will go to waste.


The 2 end tables were found at my local Salvation Army on a 60% off day for 7 bucks total! I couldn't believe the steal. I didn't even have to paint them! I had some leftover green paint, so I bought 2 more shades of green in order to make the stripes. My daughter's favorite color is green, so it was an instant hit with her.

 
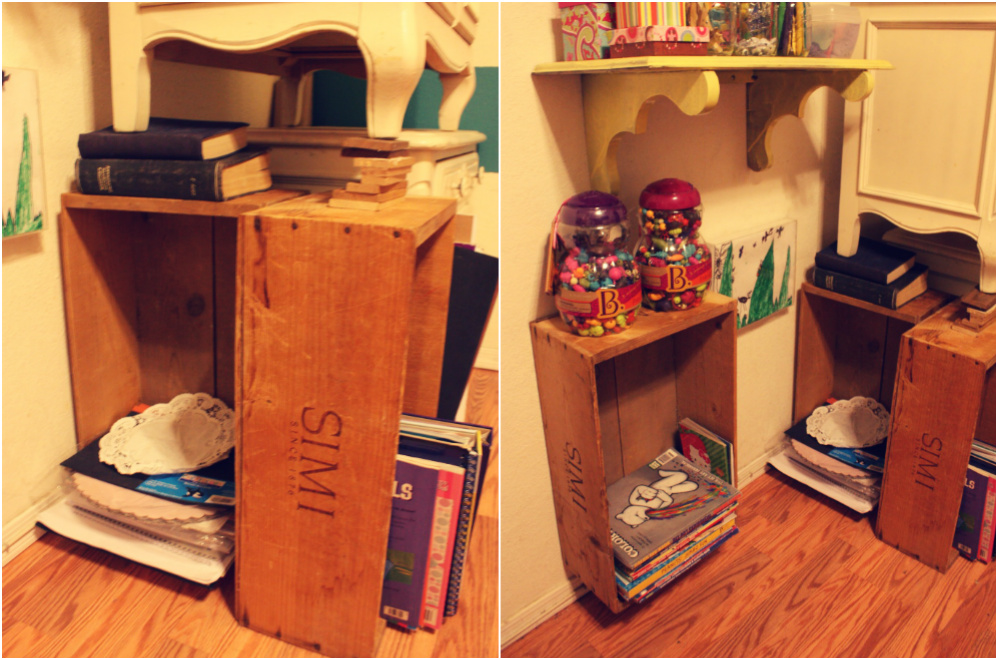
I had anticipated an easier drilling session, but it turns out that drilling in to books is a little trickier than it seems.  But I needed to keep it all very sturdy, so with the help of a nice, solid clamp, my husband and I were able to make it all work out. These shelves are made from an old wine shelf that my Mom had in my room when I was little. I simply pulled it apart and voila! I love the look of the box mounted to the wall. This way, there are 3 easy compartments- coloring books, instructional books (how to draw, craft books, etc.), and paper. Easy cheesy.

The storage was a cinch. Stickers in one drawer, supplies labeled on the bottom shelf, and craft kits up top. The blue basket is for toilet paper rolls only. My daughter can spend DAYS coming up with ideas for toilet paper roll crafts so I always keep lots of them on hand. The galvanized bucket is full of painting gear. Brushes, paints, etc. This way, it can get messy and won't leak all over the place.


This chair was my husband's project. He took one of our old kitchen chairs and sawed off the legs. Then he sanded the whole thing down and painted it yellow. He was also in charge of the chalkboard. We used the spray chalkboard paint because it was about 10 bucks cheaper. However, if I could go back, I think we'd go with the can of chalkboard paint. Little did we know, the plastic we used would not hold out spray paint so we ended up having to touch up a lot of white area with interior paint (which we already had).

I love the way my mason jars worked out for all of the small crafts. This way, it's very easy to see what is where and makes for less future mess. You will want to make sure you open the mason jar, and where the little circle disconnects from the screw on part, hot glue it. Or else you will have lots of missing tops with sharp edges. The boxes are some small gift boxes that I could never find use for and they're filled with foam stickers. Since I had so many, I only put out what would fit in those boxes. The rest are in 'craft storage' and I'll re-up as needed. FYI- googly eyes= best investment ever. Kids can make ANYTHING with enough of those little things.

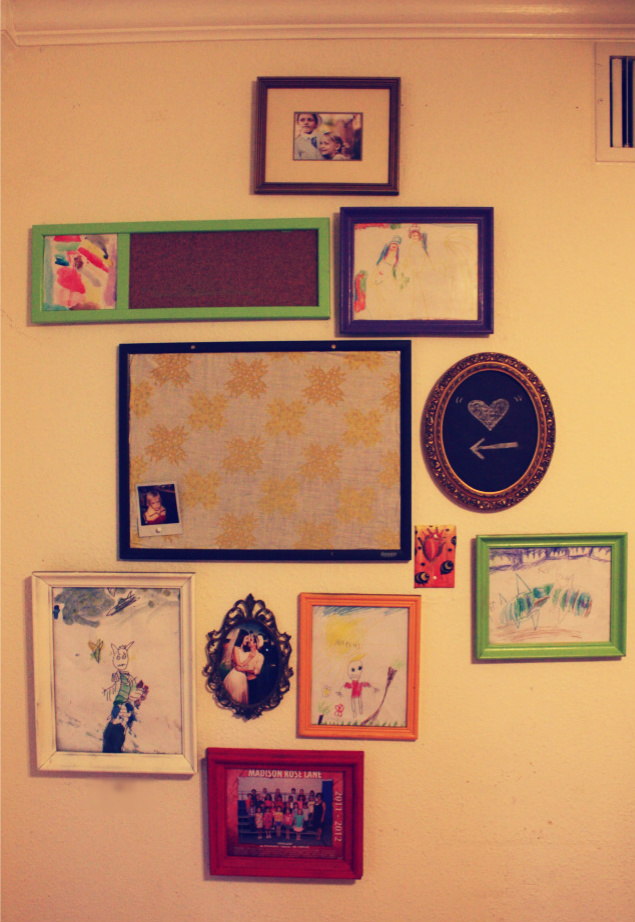
 It's no secret that I adore my children's artwork. I love bulletin boards because we can constantly change up their constantly evolving masterpieces. But I also love framed art. I found all of these frames at various thrift stores for 50 cents or less apiece. Then I used some leftover spray paint and dolled them up. The bulletin board is covered with some scrap material that I hot glued around the edges to keep in place. I only frame the best pieces, that way the kids learn to be proud of their hard work and they don't spend 1/2 a minute on a drawing just to get it framed. For that, they can stick it on the board.

Along with the framed art, I like to leave out the glass altogether and put in some black construction paper. This makes for a great little chalkboard that is easily changed. Even if it doesn't erase all that well, it's super easy and cheap to either flip it over, or switch out the construction paper.

Superhero Capes!

Christmas time has come and gone, and I'm happy to say that financially, our heads are still above water! Mostly due to the savviness of yours truly :)

These capes were easy and a huge hit with all of the little kids in the family. I made 5 total and will be making one more for my own little girl who has been begging me for one. I spent a total of about 3.50 per child. Not bad at all!

The lovely crafters at thelongthread.com provided me with the pattern here

Or, if you are more financially capable or perhaps just too busy to make your own personalized superhero cape, you can purchase your capes pre-made while at the same time supporting an amazing cause at powercapes.com