Keira's Grease Themed 7th Birthday Party


An Artist's Rainbow themed Party
An Artist's Rainbow themed Party
We'll start out with the birthday girl's outfit. I wish I would've taken some pictures for a tutorial, but I threw this dress together last minute, while I was working, so I didn't have much time to take step by step pictures. In any case, it's super simple.
1. gather a bunch of your child's old t-shirts.
2. cut off the bottoms of the t-shirts (except the top layer) and layer them starting from the bottom (I went with the rainbow theme) Also, cut off the hems of the bottom shirts.
3. sew each layer to eachother, overlapping each.
3. for the top layer, I used a handy tutorial that I found HERE
For the straps, I used leftover fabric from the shirts and braided them together.
And voila! An easy peasy tshirt dress, upcycled and free. So that mud part of the party didn't ruin any brand new birthday clothes!

Here is the food station, following the rainbow theme.
Red- strawberries
Orange- cheese cubes
Yellow- pineapple
Green- celery sticks with peanut butter
Blue- blueberries and blackberries
Purple- grapes

The cake was a smash... literally! It started out in the shade, but eventually the sunny weather overcame us all and it melted a little bit. It was delicious all the same! For the stand, I used the cake tower that my Mom made for my wedding and covered it in bits of tablecloth.

I played around a bit with the splatter paint to get it just right. For the frosting, I used this recipe, which I found on this awesome blog- cupcakerehab.com
Ingredients:
- 2 sticks unsalted butter, room temperature
- 1 cup vegetable shortening
- 1 ½ – 2 pounds powdered sugar
- 2 teaspoons pure vanilla extract
- ¼ cup heavy whipping cream (perhaps more)
Directions:
- Place the butter and shortening in a stand mixer. Beat on medium speed until fluffy. Slowly add the first pound and a half of powdered sugar, a cup at a time until all is incorporated. Turn off the mixer and scrape the bottom of the bowl very well. Add the vanilla and mix again.
- Slowly add half of the heavy cream while the mixer is on, and beat for one minute.
- Add more cream or sugar as needed to achieve a frosting consistency that’s suitable to piping.
For the splatter, I used a combination of things. For the green, I used a paintbrush and a small cup of green food coloring. Make sure you wear gloves or you'll stain your hands! For the purple, I had some decorating gel, and for the orange, I dyed some leftover frosting and then popped it in the microwave for about 15 seconds.


For the rainbow layers, I went the excruciatingly tedious route and baked each cake separately. There's a good tutorial for that HERE

The craft table was poppin' through the whole day. My Mom hooked me up with a bag of goodies including little wooden dolls and rulers to paint, foam stickers, foam photo frames, stickers, markers, and glue. All of this stuff is very inexpensive at Michael's Craft store.
-11.jpeg)
Since my Husband teaches art at the school, the kids have been obsessing over his last lesson, which was splatter paint. They've been BEGGING for more, so we found 2 inexpensive tarps at WalMart, and I used some old teacher calendars for the canvases (you know, those big calendars that teachers keep on their desk..)
I brought out a pitcher of water, a variety of brushes, straws, and some tempera paint, and the kids went wild.


After the kids were finished, I had set up drying line by tying a string all the way across the wall, and then tying a bucket of clothespins to the end.
We also set up a "rainbow rinse station" so the kids could wash off their hands without needing to go inside.

It seemed like a really great idea when I started...

However, the kids had a whole different idea of how to use my well thought out facilities... !
They had a blast!

I am all for inexpensive, but cute, goody bags. For these, I actually do have a tutorial! yay!

I just used some normal paper lunch bags


Cut off the sides, and then sew the bottom.
Voila! a cute and very inexpensive goody bag! You can't see it very well here, but I love how the colored thread is so subtle but adds color to the brown. Then I punched two holes at the top and tied on a piece of chalk to hold it all together. Inside, I put a handful of candy and a magic paint poster. The paint posters are really cool, I found them at Wal-Mart. A pack of 12 for just a dollar! So that made my total cost for all 30 bags about 15 bucks!

Here's a look at what one of the "magic paint posters" looks like. That little type above the colors says "dip a cotton swab or paintbrush in water. Use with MAGIC PAINT PALETTE to paint away!"
Time For Tea
a 7 year old's tea party
This tea party was a lot of fun. We only had a black and white printer, and the birthday girl loves to color, so I designed these 'colorable' invites

For the tablecloths, I used some sheets that we had laying around. I layered the main table's cloths. A bright pink covered by a light purple with a fancy design. It turned out great!

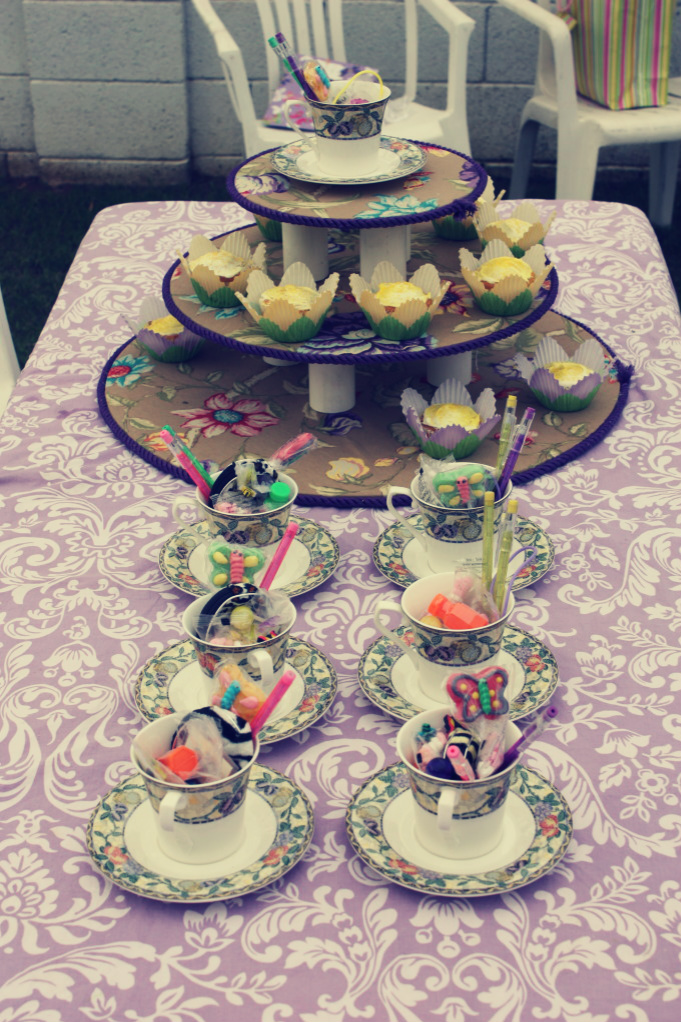
My friend found a great deal on tea cups by searching Craigslist. 14 teacups with saucers for 10 bucks! So we used those for the settings with some fabric napkins (easily made by cutting spare fabric with pinking shears)

We used a mix matched selection of cake stands and serving platters to give the party a shabby chic feel. The punch was great, I'll have to get a hold of the recipe and post it here. I filled an old teapot with macaroons, we bought raspberries, strawberries, dip, little cookies, and scones. For lunch, we used peanut butter and jelly "uncrustables" which the kids loved.

For our first activity, we made paper bag hats. We were able to get the bags from the grocery store for free, and there was a 3 for a dollar deal on paints and 14 for a dollar deal on paintbrushes at Michael's Craft store. The kids loved the hats and it sent them home with something nice at the end of the day.

After the kids made their hats, they found the face painting station, where yours truly painted each girl's face.

At the end of the day, while the girls were running around with their hats, we rinsed out the teacups and refilled them with treats. They each got to take one home as a goody.
Zombie Themed kid's birthday party
Another child is growing old...
My 7 year old wanted a zombie party.
So I spent the day making the following foods
Stuffed Cockroaches
(pulled from this site Here)
Brain Cheese and Crackers
we ran out of time, and bought some premade cheese balls, then stuffed them in to our brain mold and topped with gummy worms. Yum!
The Antidote
My husband's clever cake idea. The idea was to make each cake look like a pill. Instead, my ganache failed, but I had no complaints!


A Carnival Themed Birthday Party
I can't believe it, but my baby girl turned five last weekend... *tear*
The party was a lot of fun, my brother in law took most of the pics, but this is what I have for now. We had it at a park down the road that has a little amusement park in it. All the kids got unlimited ride bands, and had a blast the whole time. And the best part was it wasn't at my house, so I didn't have a ton of cleaning to do when it was over!


The popcorn kernals were made from marshmallows. I snipped each one 2 times with kitchen shears, and molded them in to popcorn shaped pieces. Then, I attached them with white frosting and misted them lightly with yellow food spray. After that, I printed out templates from this lovely blog here-
http://sharonrowanphotodesign.blogspot.com/2011/04/movie-party-free-download.html
then I cut out each cupcake wrap and wrapped the cupcakes using a tiny spot of hot glue.

I LOVE birthday parties! And now that I have a good camera, I love them even more! I'm in the middle of planning my Daughter's 4th birthday party. So while I plan and craft and get all riled up... here's a video I made of her 2nd birthday party - Her very own Runway Show. Complete with a runway and a dressing room. She loved it!


